While using Windows OS on a computer, the user installs various programs, operates files, writes information to media, and performs other daily operations.
The system ends up cluttered with a lot of temporary files, erroneous registry references and other unnecessary objects, which leads to errors, crashes and freezes
It becomes impossible to work comfortably with the computer, as a result of which the decision is made to reinstall Windows on the computer. This can be done in three ways, depending on what OS the computer is running. The first method, suitable for inexperienced users and the easiest to use, is to reset the OS to its original state while saving or deleting personal files, but this method is only available to users and 10. Other options require the presence of media, since reinstalling Windows 7 without a disk or flash drive impossible. Therefore, you will additionally need to study all the nuances that the user will encounter when reinstalling Windows from installation media.
Reset
To reset Windows, you will need:
- Start the computer in normal mode.
- Open Start and go to the Settings menu. If this application is not pinned to the start screen, then use the search bar by typing the name of the section and selecting it in the search results.
- Go to the "Update and Security" section.
- Open the "Recovery" tab.
After completing the manipulations described above, the computer will ask if it needs to save the data when reinstalling windows
As soon as the user selects one of the proposed options, the computer will reboot. Reinstalling Windows on a laptop takes about an hour, depending on the method chosen.
Reinstallation from media
Reinstalling Windows from a flash drive or CD is a more costly process in terms of time and effort. You can start the procedure in two ways:
Tip: before starting the reinstallation, it is recommended to make sure that you have drivers for all the main devices of the computer, namely the video card, audio card and network adapter. If the user does not take care of this in advance, after changing the OS, the computer will not be suitable for normal use.
Installation from a running system
The process of reinstalling Windows from an already working copy of the OS should not cause difficulties. The user needs to prepare a digital medium (disc, flash drive) and insert it into the appropriate reading device on the computer, be it a CD drive or a USB port. After Windows reads the information from the disk, an autorun program will appear in which you should select the “Install” option.
The program will start copying the installation files and then send the computer to rebootRearranging from BIOS
Installing a system from the BIOS is not like installing Windows 7 from a disk for dummies, since here you need to get into the basic input/output system of the computer (this is what the name BIOS stands for) and change some parameters, which requires basic knowledge of the English language.
First you need to turn off the computer and turn it on again, paying attention to the very first screen that appears when the boot starts. The bottom of the monitor usually indicates which key on the keyboard should be pressed to enter the BIOS. Sometimes the motherboard manufacturer writes there a separate button to open the Boot Menu, in which case you should give preference to this section.
If only a button is indicated to enter the BIOS (for example Del, F2 or F12), click on it and wait for the section with basic PC parameters to appear. Depending on what version of Windows is installed on your computer, you should find either the “Boot” section or in the “Advanced BIOS Features”. Here you need to change the "First Boot Device" setting to "CD-ROM" or "USB" based on the type of media the user is reinstalling from. Press ESC to exit to the main BIOS menu, and then save the changes using the “Save and Exit Setup” line.
Reinstallation program
At this stage, the methods described above for starting a Windows installation from media will converge on one scenario, and then events will develop in a similar way. The program will unpack system files in semi-automatic mode, near the end of the installation giving the user the opportunity to configure some PC parameters.
Depending on the OS edition, the computer will ask you to specify the time zone, set the language for the keyboard and interface, and request a username and password for the account being created. In some cases, Windows asks for a license key for initial authentication. New OSes (8 and 10) offer to set privacy settings and connect to a wireless Wi-Fi network.
Actions after reinstallation
After reinstalling Windows XP from a disk (or WIN7 from a flash drive, as in the examples above) is completed, you will need to restore the files after reinstalling Windows and reinstall the missing drivers. To do this, use the following recommendations:
- If you used OneDrive on your computer, reinstall the client program and the device will automatically download files stored in the cloud.
- To install the latest drivers, visit the official websites of computer component manufacturers. Software for the video card is available at nvidia.ru and support.amd.com.
Data recovery after reinstalling Windows is also possible from a previously created backup media or from another partition of the hard drive if a preliminary copy was made there. During installation, the OS cleans only the partition to which files are copied.
WATCH THE VIDEO
Now you know how to reinstall Windows.
Hello dear readers of the blog helpcomputerblog!
Quite recently, I had to face the issue of reinstalling the operating system. I want to note. that sooner or later this question or this situation arises for all PC users.
So let's figure out how to change the operating system.
First, we need to prepare: acquire an image of the system that we will install (the image can be written either to a flash drive or to a disk) and written installation instructions.
We install a boot disk (the disk on which the image of our system is recorded) or a flash drive into the USB connector into the tray.
Press simultaneously ALT+CTRL+Delete, which will cause the system to reboot.
It should be noted that during the reboot we need to get into the BIOS of our PC (BIOS is set by the motherboard manufacturer), in most cases you can get into the BIOS through the following keys:
- F1 – for Dell, IBM, Packard-Bell, HP computers;
- F2 - Samsung, Asus, Acer;
- F3 – Sony, Dell;
- F10 – Compaq, Toshiba;
- F12 – Lenovo;
The access buttons are indicated on the initial splash screen (by the motherboard manufacturer) when you turn on the computer. Let's say. that our access button is Delete, click it.
After clicking Delete. we go to the BIOS menu, in the name of the displayed menus we find the name Coms Setup Utility, if this inscription is present on the screen, then you are on the right track.
Next you need to find Boot Menu

and choose how to boot our PC, with CD/DVD-ROM or flash drive. By default, the first position is to boot from the hard drive, so we must set the CD/DVD drive in the boot list to first place, for this growth, select the first position and press Enter, then use the arrows to select CD/DVD and press Enter again. all is ready.

After all the manipulations, we need to restart our PC. To do this, go to the point Exit and press Enter, confirm, the computer reboots.

After rebooting, a message should appear at the top of the screen “press any key to boot trom CD or DVD”, to continue you must press any key, this operation is a confirmation of our intentions.


Select the language we need and click next.

Click install.

 Let’s read and agree to the license terms, check the “I agree” box and click Next.
Friends, many letters come with the question of how to properly reinstall or update the Windows 7 operating system and what exactly is the difference between these two concepts.
Letter No. 1. Please bring clarity to a question that is confusing for many, than reinstalling Windows 7 different from the update and which is better to prefer? The operating system 7 I have installed behaves extremely unstable, it takes a long time to load, many programs have stopped installing, sometimes errors like this appear, for example, some system file or dynamic library is missing. Rolling back a significant period of time using a restore point did not help. I don’t want to reinstall again, since I have a lot of programs installed. In your comment you said that you need to restore system files, put things in order in startup, optimize Windows 7, or, as a last resort, update or reinstall Windows 7, but unfortunately I haven’t heard anything about the latter.
I would like to know, firstly:
How to actually carry out this update or reinstallation of the operating system and what will happen to my personal files on the system partition, will they be lost?
Secondly: they say that the update is launched only from a running operating system. Is it so? After all, it was possible to run an update in XP even when the system did not boot at all. Thanks in advance, Pavel.
Reinstalling Windows 7
To make everything clear to you, I will walk you through the process of updating your operating system, and then I will show you how to reinstall Windows 7 in two ways and you will see everything with your own eyes, but first I will still explain to you what an Update is and Reinstalling Windows 7.

What is a Windows 7 update?
This is installing a system on top of the old one, that is, you insert a disk with the Windows 7 distribution and start installing the system directly in the running 7, but in the installation menu you select not a full installation, but an update. What does it give?
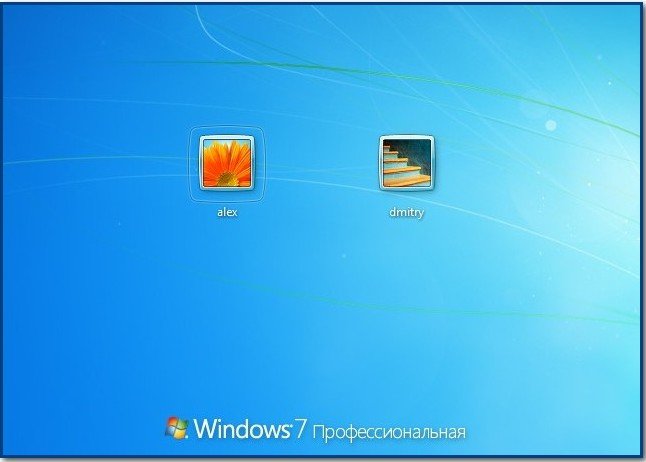
First of all, damaged system files will be replaced, working system files will not be replaced, nothing will happen to your personal data: installed applications, documents, music, all your programs will run and your entire household on all disks will remain untouched. Also, user accounts will be transferred without changes; all this will be done by the Windows Easy Transfer tool (very important files, it is still better to transfer them manually). I also want to say that you will have to re-enter the product key, select the language, region, set the time, and so on. Warning. If you have a counterfeit Windows 7, after upgrading you will have a window in the lower right corner of your desktop warning you that your copy of Windows is not genuine.
- They also often ask how the Data Transfer Tool works? When updating Windows 7, temporary folders of your data will be created containing information about user accounts and settings, your email, files in the Favorites folder, personal files and user folders - music, images, videos, as well as parameters of installed programs . Once your system is updated, all data will return to its place, and temporary folders will be deleted. When upgrading, the data transfer tool does not allow the user to select files to transfer, but when reinstalling, you can select what you want to transfer (details below).
Will the update solve all your problems related to Windows 7? In most cases, Yes, but unfortunately no one can guarantee a 100% result here. In my opinion, if possible, it is better to delete and reformat the partition with a poorly functioning operating system, having first transferred all important files to other hard drive volumes or a portable USB drive and reinstall the system with all programs.
- Note: Windows XP has the same update mechanism and it can be launched both in a running operating system, and in cases where you cannot log into Windows XP due to problems, then you can boot from the XP installation disk and select setup menu option, . Please be aware that in Windows 7, unfortunately, there is no such option and the update can only be carried out in a running operating system.
What is reinstalling Windows 7?
Reinstallation is a complete replacement of all operating system files, that is, formatting a partition with an unstable system and installing Windows 7 again. Naturally, all your files and the system itself will be deleted from the drive (C:). In order to transfer all your files from the system drive (C:), you will need to use Windows Easy Transfer, but it will no longer work automatically, as in the case of an update, but we will use it ourselves and we will also choose what we need to transfer from the old system to the new one ourselves.
- Now this begs the question: What is the difference between reinstalling the system and installing it again? Friends are just here. When reinstalling Windows 7, you can use File Transfer Tool if you wish, since you already had the system installed once, but when simply installing the system again, install the system on the partition you created on the new hard drive. In short, here it is, I don’t know how to explain it more clearly!
What can I say, let's first update my Windows 7 together, and at the end of the article we will reinstall the system using the file transfer tool, it has also been working with errors for me lately and you will see with your own eyes, and then select what you need.
Windows 7 update
We insert the installation disk with Windows 7 into the drive; if you do not have autorun, click setup.exe.

Before updating, we can connect to the internet and download the latest updates from the official Microsoft website
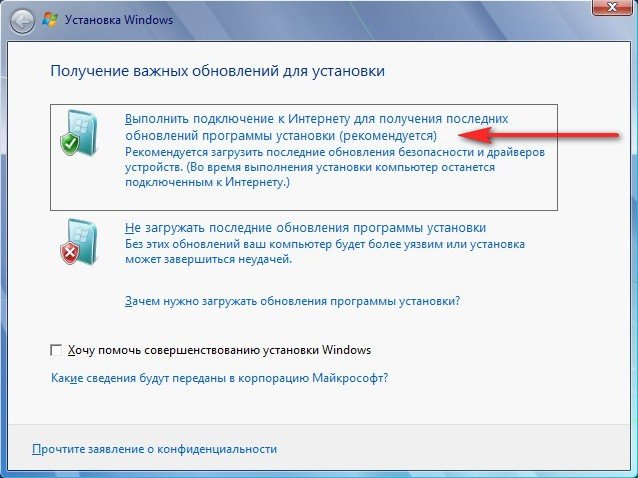
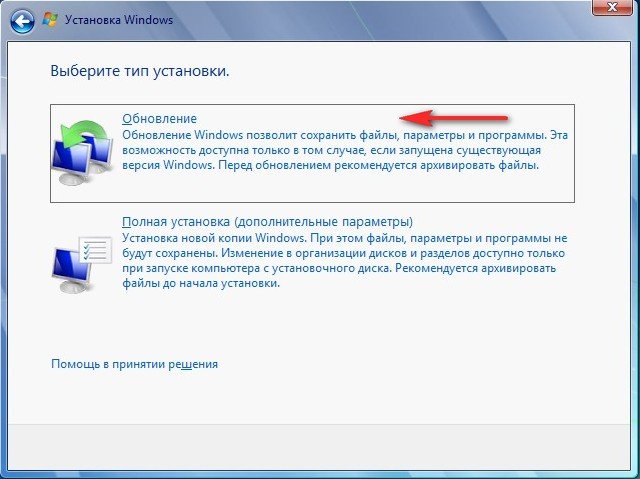
Select Update
Compatibility check

Copy Windows files

Collecting files, settings, and programs, Unpacking Windows files, Installing features and updates, Transferring settings and program files


The computer restarts.
At this point you need to boot from the hard drive, and not a bootable USB flash drive or boot disk with Win 7.
Updating Registry Settings

Enter the key

Setting the time
The update process is completed, the accounts are saved
All my files are in place, all programs run.
Reinstalling Windows 7
Now let's find out what Reinstalling Windows 7 is. According to the rules, we will reinstall Windows 7 on the same disk on which the old operating system is installed. If Windows was previously installed, for example, on the (C:) partition, then you need to reinstall it on the (C:) partition and not on any other partition (otherwise this will be the installation of a second operating system). All your files on the partition (C:) will be replaced with files from the newly installed Windows 7 operating system.
- First of all, we will launch the Data Transfer Tool, which will copy all our personal data from the Windows 7 partition to portable media or another hard drive partition, then we will boot from the Windows 7 installation disk (how to install it in) and install the system again. Immediately after installing Windows 7, let's launch Data Transfer Tool and copy all our files back, as a result we will get a new operating system and all our data: music, documents, personal folders, and so on.
- Note: You may ask: Is it possible to start installing a new system directly from a running Windows 7 and not go into the BIOS. Answer: This method is given at the end and we will also consider it.
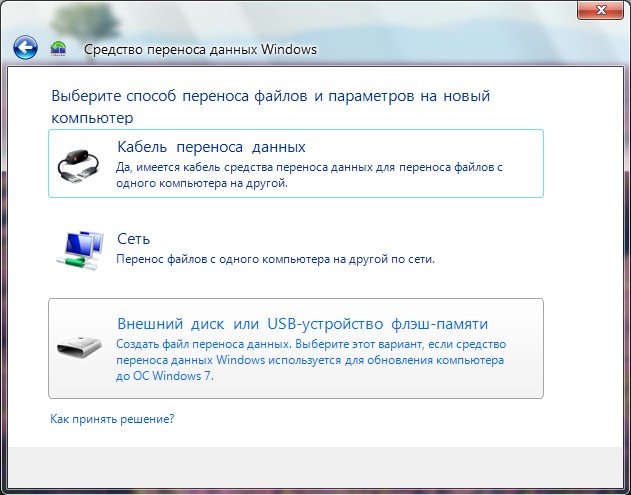
Let's now see what the Data Transfer Tool will transfer from our files, let's launch it.
Start, write in the input field Data Transfer Tool

In this window we see detailed information about which files we can transfer from the old operating system to the new one, we will now select.

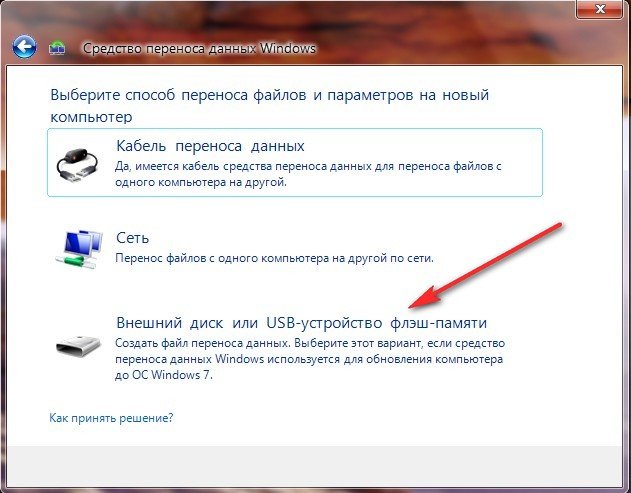
The data transfer tool suggests us to use:
- Data transfer cable - a cable specially designed for this purpose, which still needs to be purchased, is used to transfer files between two computers; in principle, we do not need this, because we have one computer.
- Network – transferring files over the network is also not our option.
- External drive or USB flash memory device. What we need. If you don't have much data, you can even use an 8GB or 16GB flash drive. By the way, if you don’t have a flash drive or a portable USB drive, you can use another partition of your hard drive for storage, like I did for example.
So you selected an External drive or USB flash memory device, and I selected a partition on the hard drive (D:).
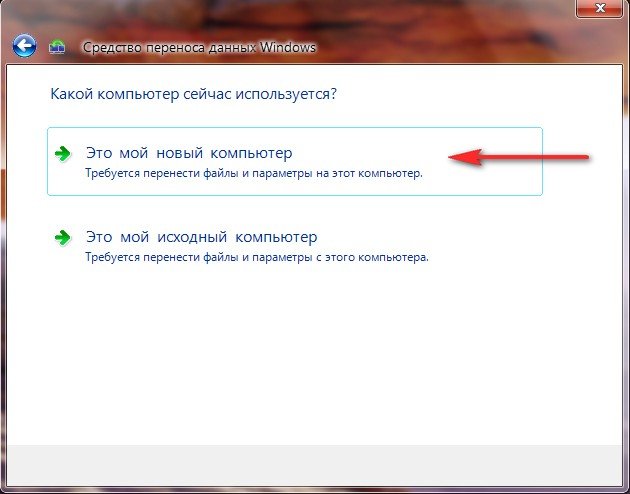
We select This is my source computer, that is, the data needs to be transferred from it.

Data that can be transferred to the new system is analyzed at Usernames and General elements, click Settings, and also if you click Advanced, a full picture of what the Data Transfer Tool will include in the archive will open.
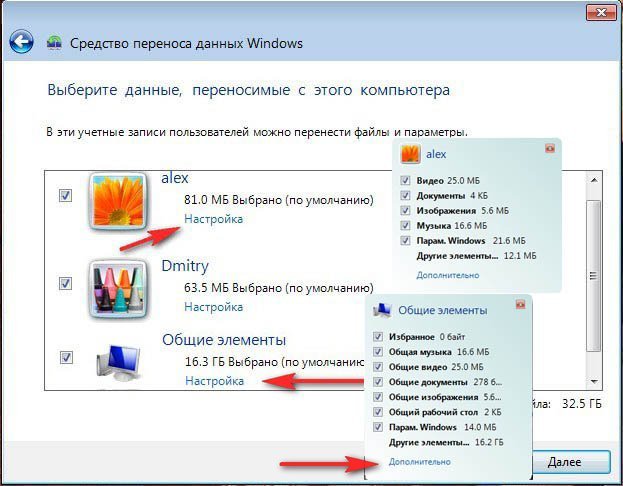
Please note that the archive includes the folders of both operating system users and personal data, this is correct. But we definitely don’t need to transfer data located on all partitions of the hard drive except the system one (C:), since we will be reinstalling Windows 7 located on (C:) and the reinstallation process in our case will only affect the system partition ( WITH:). Uncheck all hard drives.


However, if you decide to transfer data from all partitions, you can leave the checkbox unchecked, just keep in mind that the data transfer file in this case will occupy a very large volume..
What else should not be included in the archive that the data migration tool will create? For example, you may not include the C:\Program Files folder; it would be safer to install all programs again after reinstalling Windows 7.
So click Save, you can assign a password


The file transfer process is in progress. A transfer file with the extension (MIG) is created on disk (D:)


Now it’s time to reinstall Windows 7, insert the installation disk with the seven into the drive and reboot, at the beginning of the installation it’s better to click on the Disk Setup button and select Format partition with the previous Windows 7, and in general the whole process step by step, starting from changing the boot device priority in the BIOS and before installing the operating system itself, described in our article.
I think you’ve done it and installed the system, now let’s use our Data Transfer Tool again.
Select This is my new computer (you need to transfer files and settings to this computer)
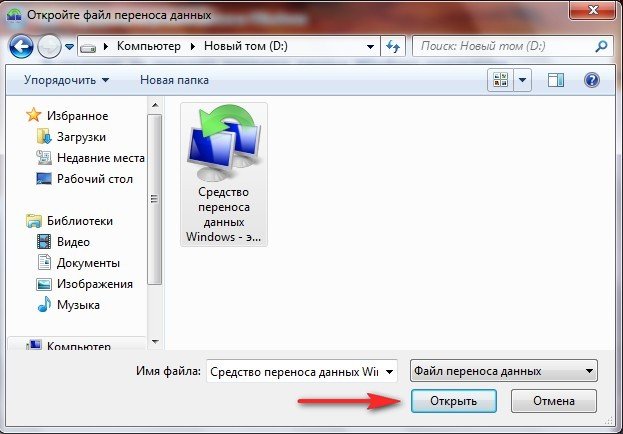
Your external hard drive with the data transfer file should already be connected.
I, in turn, indicate the hard drive partition (D:), the transfer file is located there.

We can click Settings and select files to transfer to the new system manually, as we have already done, or simply click Transfer.

The transfer is complete, we can look at the report and also make sure that all your files have been transferred to the new system.
Do you want to install Windows 7 on your computer or laptop, but don’t know how? It's not as difficult as it seems. Although the first time, of course, will be difficult. But, once you figure it out, you will become a real “IT master” and will be able to independently install Windows 7 on any computer or laptop.
Before installing Windows 7, print this page. This will make your task much easier. After all, during the installation of Windows 7 there will be no access to the Internet. The only exception is when you have a second PC, laptop or smartphone, from which you can, if necessary, access the site again and see what to do next.
When is Windows 7 installed?
- You bought a new laptop or computer. Everything is clear here. In most cases, laptops or PCs either do not have any operating system at all, or do not have the one you need (for example, the ancient MS-DOS).
- You didn’t like Windows 10 or 8, and you want to install the good old “seven”.
- There was a malfunction, a virus or ransomware advertising banner was caught, the computer or laptop does not turn on, etc.
Let's dwell a little on the last point. If problems occur with your computer or laptop, do not rush to reinstall Windows. Firstly, reinstalling the operating system is done as a last resort when other methods have not helped.
Secondly, remember that after installing Windows, all data is erased, at least on local drive C. And these are all your programs: browsers, video players. And you will have to install everything again.
Thirdly, there are no guarantees that reinstalling Windows will help solve the problem. But the files on local drive C will be deleted permanently in any case.
Therefore, first, try to look for other solutions to restore your PC or laptop. For example, the following articles may help you:
You can also always look for other articles on this blog or through Google/Yandex.
Preparing to install Windows 7 OS
The first thing you need to do before installing Windows 7 on your laptop is to copy all important information. At least from local drive C. After formatting, all data on it will be erased.
If you bought a new computer or laptop, you can skip this step. In all other cases, this is a prerequisite!
Therefore, save all files, documents, pictures, audio tracks and videos from your desktop and from the “My Documents” folder. It is also recommended to look at the local drive C - important information is also written to it quite often. Where to save? On a disk or flash drive. Another option is to upload files to online services (Yandex.Disk, Google Drive, etc.).
By the way, sometimes you can copy some programs along with the settings. For example, bookmarks and passwords from the browser you used.
The second point that needs to be made is to determine what bitness of Windows 7 you need - x86 or x64. Everything is very simple here. If you have 4 GB of RAM (or more) installed on your laptop or computer, then you need to install Windows 7 x64, and if less, then x86.
Why is that? The fact is that the x86 version does not see 4 GB of RAM. The maximum that it shows is 3.25 GB.
How to find out the amount of RAM? If you have a new computer, look in the documentation. And if it’s a laptop, then the characteristics are indicated on its case (or on the box).
If you already have Windows installed, then the amount of RAM can be viewed as follows:
The third thing that needs to be done before installation is to burn a digital copy of Windows 7 to a disk or flash drive.
If you already have a boot disk (bought or given in a store along with your PC), then skip this step.
Burning a DVD is easy. After all, you've probably already recorded films, music, games? This can be done through Nero, Alcohol 120% and other programs.
As for the USB flash drive, there are some difficulties. Therefore, in this case, I recommend reading -.
Where can I get a Windows 7 image or installation disk? Can be purchased in store or online.
And the last thing you need to do before installing Windows 7 is to prepare drivers for your laptop or PC. Driver discs are usually included with your computer. If you have them, then you can skip this point.
Laptop owners are not provided with disks, so you need to install drivers from the manufacturer’s official website (search by the name of your model).
If you skip this step, you may be left without internet. After all, you need to install a driver for it. USB ports may also not work. That is, a mouse. And in the end you will have to go to a friend or acquaintances and download the drivers from them.
This completes the preparatory process. Check again that you have saved all the important data, then connect a USB flash drive or insert a DVD with the Windows 7 installation image and restart your laptop/computer.
Setting up BIOS for installing Windows 7
Perhaps setting up the BIOS is the most difficult stage for most users. Especially for beginners.
In addition, the difficulty here is that the BIOS versions may differ on different PCs and laptops. And the buttons to enter the BIOS too. As a result, some users cannot even enter the BIOS. Therefore, to avoid problems with this, let’s consider in detail what needs to be done and how.
So, when you have prepared everything, restart the computer, and immediately when the screen turns on, repeatedly press the Del button (for PCs) or F2 (for laptops). If you did everything correctly, you will see the BIOS screen. Something like this:

Or this:


There are 4 devices displayed here - First Boot Device (first), Second (second), etc. By default, the first one is the hard disk (Hard Disk or HDD). And you need to put the CD-ROM (disk) or USB-HDD (flash drive) on the first line - depending on which device the seven will be installed from.
How to do it? On a PC, you usually need to highlight the first item, press Enter and select the desired option from the drop-down list.

On laptops, the device boot priority can be changed using the arrows or F5-F6 buttons. Control keys are usually located on the right or at the very bottom of the BIOS screen.

When you select the desired device (CD-ROM or USB-HDD) in the first item First Boot Device, be sure to save the settings and then exit the BIOS. Which save button? This is also written at the bottom of the screen (usually F10).
If you have a BIOS UEFI (new version), then simply drag the desired icon (disk drive or flash drive) to the first place with the mouse and click “Exit” in the upper right corner.

After this, the laptop or computer will reboot and the installation of Windows 7 will begin.
If all this is too complicated for you, there is another option to configure booting from a disk or flash drive without going into the BIOS. For this you can. But this method only works on new PCs and laptops.
Step-by-step instructions for installing Windows 7
Immediately after rebooting, you will see a black screen with a single line.

Here you need to press any button - for example, Space.
If this message does not appear, it means that you did not save the BIOS settings. Check them again. If everything is fine there, then either you did not write the bootable USB flash drive correctly, or the disk is damaged and the computer/laptop does not see it (the disk drive may not be working).
After clicking the button, you will see a black screen with the inscription “Windows is downloading files...”.

Wait for the system to copy everything. After this, a new window will appear on the screen. Select Russian language and click “Next”.

In the new window, click the “Install” button.

If there are several versions of Windows 7 recorded on a disk or flash drive, you need to choose the appropriate one. We have already figured out the x86 and x64 bit depth, so decide for yourself here. As for the version, it is better to choose “Maximum”. Although there is almost no difference between it, “Home”, “Beginner” and “Professional”, so this is not so important. Select the desired item and click “Next”.

Agree to the license terms (check the box) and proceed further.

Choose the full installation.

A window will open asking you to select a partition for installing Windows 7. But here it’s worth going into more detail.
How to partition a disk during first installation?
If the installation is performed on a new computer or laptop (i.e. for the first time), then you will see only one line - “Unallocated disk space”.

And in this case, you need to split the hard drive into 2 partitions - local drive C and D (more is possible, but this is not necessary). To do this, select this line, click the “Create” button, indicate the disk size (in megabytes) and click the “Apply” button.

Don't know how much 50 GB is in megabytes? Write a number at random - for example, 50000. And then see what volume the system will show for the created partition. If it turns out too little, select it, click the “Delete” button, and try again, specifying a larger number.

For Windows 7 to work properly, you need to create a special partition with a capacity of 100 MB where boot files will be stored. So when the next window pops up, just click OK.

When you specify the required volume for local drive C and create it, “Partition 2” will appear. This is him.

After that, select the “Unallocated space” line again, click “Create”, and then the “Apply” button. After this, local disk D (“Partition 3”) will appear.

If you forget to do this, then after installing Windows 7 there will be only one local drive C. And partition D will “evaporate” into thin air. You'll have to reinstall Windows again. Therefore, before moving on, make sure that the “Unallocated Space” option is no longer there.
To install Windows on local drive C, select “Partition 2” and click “Next”.

If you reinstall Windows 7, then the following window will appear on the screen:

In this case, you need to select “Section 2” and click the “Format” button. This will delete all data on it. When the formatting process is complete, select this section again and click “Next”.
By the way, if you want to distribute the volume differently between local drive C and D, you can delete them and create them again, specifying a different size. How to do this is written in the previous paragraph. But remember: in this case, the information will be deleted on the local drive D too! As a result, your PC or laptop will be clean, as if you had just bought it. Therefore, perform this procedure only if you have saved all the necessary files.
Continue installing Windows 7
So, you were able to partition your hard drive or format it before installing Windows 7 and clicked the “Next” button. After this, the operating system will begin to install. Wait until the files are copied.

After this, the computer/laptop will reboot and you will again see the familiar black window with a single line.

Under no circumstances press anything on the keyboard, otherwise everything will start all over again.


After this, the computer or laptop will reboot a second time.
Well, the main thing is already behind us, all that remains is to fill in some fields:
- Indicate the username and computer name (if you plan to play games, it is better to write in Latin).

- You don’t have to set a password - in that case, just move on.

- If you have a digital copy, you also don’t have to specify the activation key (usually Windows 7 is activated automatically when you connect to the Internet). To skip this step, click Next. And if you bought a disc, then enter here the code that is written on the sticker.

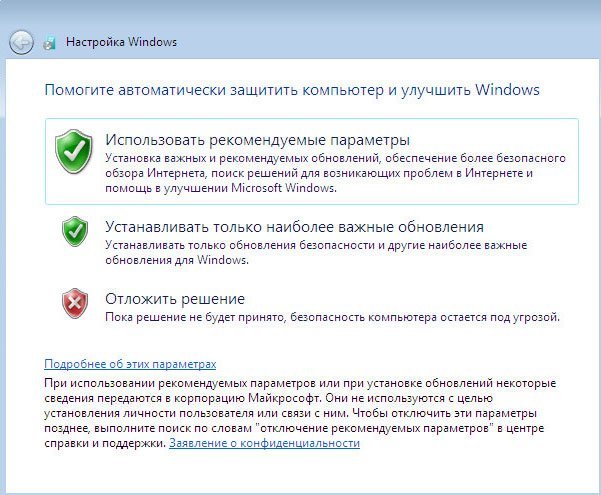
- Here it is recommended to select the “Delay decision” option (you can change these settings later).

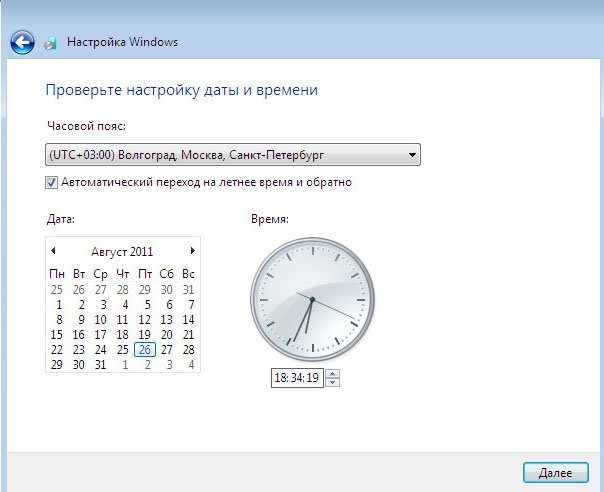
- Select your time zone, specify the time and click “Next”.

- If Windows automatically finds drivers for the Internet, then in the new window select “Home Network”.
- Wait while the desktop setup is completed.

- Congratulations – you have just been able to install Windows 7 on your laptop or computer yourself.

What to do after installing Windows 7?
First of all, reboot your laptop or computer, go into the BIOS and change the device boot priority back. That is, put the hard drive (Hard Disk or HDD) in first place, and lower the CD-ROM or USB-HDD to second or lower.
Also, after installing Windows 7, the Internet and USB connectors may not work. This is because there are no drivers. Therefore, at the next stage you install them.
This is precisely why you need to prepare all the necessary drivers in advance before installing Windows 7. Especially for the Internet. After all, how will you download them if you don’t have access to the network?
And one more nuance - when you turn on your computer or laptop, you may see two Windows 7 (during boot).

The first one was installed by you, and the second one was saved in a hidden section (“reserved by the system”). However, the extra line can be deleted. To do this, do the following:

Ready. After the reboot, the second Windows 7 will no longer exist, and you will not see the operating system selection menu.
If you have any questions, ask them in the comments.

Good afternoon. Reinstalling the Windows 7 operating system is no more difficult than Windows XP. It's even easier to do this. If the user has already reinstalled XP, then Windows 7 will cope even more so. If you did not reinstall XP, then I will help you understand how to reinstall the Windows 7 operating system.
To reinstall Windows from a disk you need
Pay attention to what processor your computer has. It must be at least 1 GHz and above. It can be To view this data, you can use “My Computer”. Or you can use special free programs for these purposes. Personally, I use or Aida.
The RAM must have at least 1 GB of memory. The disk on which you are going to install the OS should have a capacity of about 30 GB. Personally, I use disks with a capacity of 50-60 GB for these purposes. You need so much for various reasons: you need space to upload files, to install various additional programs. When you install various programs, they will automatically be installed on the system drive C.
You can, of course, redirect them to other drives, but not everyone is configured for redirection. In addition, the system needs enough free space to operate efficiently. Why make it difficult for her to work?
Among other things, Windows 7 exists in different versions, each version takes up a certain amount of space. Levels Windows 7 are divided into Beginner, Home Basic, Home Advanced, Professional and Ultimate. Personally, I use Maximum. I tried Home Extended, but it didn’t suit me. Also, any of these versions can be either 32-bit or 64-bit. When choosing disk space, take this into account.
Reinstalling Windows 7 OS
Next, let's proceed to the actual reinstallation of the operating system. Many people reinstall directly from a running system, without using the BIOS. But if your system crashes, then this will be difficult to do. In this article, let’s imagine that everything is fine with your system and we’ll try to install it with a working system.
First of all, insert the disc with your OS into the DVD drive. Wait for the “Install” window to appear. Click on this button. Next, temporary files are copied and installation begins.
Next, the program begins to collect information. The system offers to download updates from the manufacturer’s website. If you have a licensed version, you can select this item; if not, then select the bottom item, which allows you not to download the latest updates. Then you need to accept the license agreements and click “Next”.
In the next step, select the installation type. We are going to reinstall the system completely, which means we select “Full installation”.

Now let’s choose which drive we will install our operating system on. In most cases, system drive C is chosen for this purpose. If you chose any other drive, install the system on it. This disk must be prepared, that is, it must not contain important elements. Click “Next”:


Now the system is installed directly. The OS will begin copying files, unpacking files, installing components, installing updates, and completing the installation.
When installation occurs, the PC will reboot several times in a row. When the first installation takes place, we will see a window labeled “Installing Windows.” Next, the installation process will proceed as planned.
Installation will take approximately half an hour. The PC will reboot several times until the final stage “Complete installation”.


When the last reboot is completed, if we decided to add a second system, we will be offered a choice of OS to boot the PC.
If we only need one system, then we will install the new one on top of the old one, then the installation will continue automatically. Next, select the Russian language.

Next, we should specify the PC name, then specify the password. If it is not necessary, click “Next”. Same thing with the key. If it is not necessary, click “Skip”. We select the time zone and date.
Then, if we need the system to be updated automatically, we select this option, this is with a licensed system; if not, then we will postpone the decision. Then we will have the new system running for the first time. Then it will be reinstalled several more times until the installation is completed.
I hope my article “How to reinstall the operating system?” helped you. You are now convinced that there is nothing complicated here. In the future, you need to install all the programs you need and make the computer’s connection to the Internet active. Also, do not forget to activate the drivers and insert all the installation disks for your boards if your computer requires it. Also activate Windows 7 if activation is required.
I hope my article helped you understand “How to reinstall the Windows operating system?”
Sincerely, Andrey Zimin 01/28/2014
An anecdote in every article.