Quite often, a strange situation is observed: with a high-speed wire, a very narrow wifi channel is heard from the router, which does not load even half of the wire. At the same time, although formally Wi-Fi, especially in its ac version, supports some huge speeds, when checking it turns out that either Wi-Fi connects at a lower speed, or connects, but does not give out speed in practice, or loses packets, or all together.
At some point, I also encountered a similar problem, and decided to set up my Wi-Fi in a human way. Surprisingly, it took about 40 times longer than I expected. In addition, it somehow happened that all the Wi-Fi setup instructions that I found converged to one of two types: the first suggested putting the router higher and straightening the antenna, while reading the second I lacked an honest understanding of spatial multiplexing algorithms .
Actually, this note is an attempt to fill a gap in the instructions. I will say right away that the task has not been fully resolved, despite decent progress, the connection stability could still be better, so I would be glad to hear the comments of my colleagues on the topic described.
Chapter 1:
So the problem statementThe Wifi router offered by the provider has ceased to cope with its duties: there are long (30 seconds or more) periods when the ping to the access point does not pass, very long (about an hour) periods are observed when the ping to the access point reaches 3500 ms, there are long periods when the connection speed with the access point does not exceed 200 kbps.
Scanning the range using the inSSIDer windows utility produces the picture presented at the beginning of the article. There are 44 Wifi SSIDs in the 2.4 GHz band and one network in the 5.2 GHz band in the district.
Solution Tools
Celeron 430 self-assembly computer, 2b Ram, SSD, fanless, two wireless network cards based on Ralink rt2800pci chip, Slackware Linux 14.2, Hostapd from Git as of September 2016.
Assembling the router is beyond the scope of this post, although I note that the Celeron 430 performs well in fanless mode. I note that the current configuration is the latest, but not final. Perhaps there are still improvements to be made.
Solution
In fact, the solution would, for good, be to run hostapd with minimal configuration changes. However, experience so well confirmed the truth of the saying "it was smooth on paper, but forgot about the ravines" that it took the writing of this article to systematize knowledge about all the non-obvious details. Also, I initially would like to avoid low-level details for the sake of harmony of presentation, but it turned out that this is impossible.
Chapter 2
A bit of theoryFrequencies
Wi-Fi is a standard for wireless networks. From an OSI L2 point of view, the access point implements a switch type hub, but most often it is also combined with an OSI L3 switch of the "router" type, which leads to a fair amount of confusion.We will be most interested in the OSI L1 level, that is, in fact, the environment in which the packets go.
Wi-Fi is a radio system. As you know, a radio system consists of a receiver and a transmitter. In Wi-Fi, the access point and the client device perform both roles in turn.
The Wi-Fi transmitter operates on a certain frequency. These frequencies are numbered, and each number corresponds to a certain frequency. Important: despite the fact that for any integer there is a theoretical correspondence to this number of a certain frequency, Wi-Fi can only work in limited frequency bands (there are three of them, 2.4 GHz, 5.2 GHz, 5.7 GHz), and only on some of the numbers.
A complete list of correspondences can be found in Wikipedia, but it is important for us that when setting up an access point, you need to specify which channel the carrier frequency of our signal will be on.
An obscure detail: not all Wi-Fi standards support all frequencies.
There are two Wi-Fi standards: a and b. "a" is older and operates in the 5GHz band, "b" is newer and operates in the 2.4GHz band. At the same time, b is slower (11 mbit instead of 54 mbit, that is, 1.2 megabytes per second instead of 7 megabytes per second), and the 2.4 GHz band already accommodates fewer stations. Why this is so is a mystery. It is doubly a mystery why there are practically no standard access points in nature.

(Image borrowed from Wikipedia.)

(Actually, I'm being a little disingenuous, because a also supports the 3.7 GHz frequency band. However, I haven't seen a single device that knows anything about this band.)
Wait, you ask, but there are also 802.11g, n, ac - standards, and they seem to just beat the unfortunate a and b in speed.
But no, I will answer you. The g standard is a belated attempt to bring speed b to speed a, in the 2.4 GHz band. But why, you answer me, did you even remember about b? The answer is because even though the ranges of both b and g are called 2.4, they are actually slightly different, and the range of b is one channel longer.
The standards n and ac have nothing to do with ranges at all - they regulate the speed, and nothing more. Standard point n can be either "in the base" a (and operate at 5 GHz), or "in the base" b and operate at 2.4 GHz. I don’t know about the ac standard point, because I haven’t seen it.
That is, when you buy an access point n, you need to look very carefully at what ranges this n works in.
It is important that at one time one Wi-Fi chip can only work in one range. If your access point claims that it can work in two at the same time, as, for example, free routers from popular providers Virgin or British Telecom do, then it actually has two chips.
Channel Width
Actually, I have to apologize because I said earlier that one range is longer than another without explaining what "longer" is. Generally speaking, not only the carrier frequency is important for signal transmission, but also the width of the coded stream. Width - this is what frequencies above and below the carrier the existing signal can climb. Usually (and fortunately in Wi-Fi), the channels are symmetrical, centered on the carrier.So in Wi-Fi there can be channels with a width of 10, 20, 22, 40, 80 and 160 MHz. At the same time, I have never seen access points with a channel width of 10 MHz.
So, one of the most amazing properties of Wi-Fi is that despite the fact that the channels are numbered, they intersect. And not only with neighbors, but even with channels through 3 from yourself. In other words, in the 2.4 GHz band, only access points operating on channels 1, 6, and 11 do not intersect with 20 MHz wide streams. In other words, only three access points can work side by side so as not to interfere with each other.
What is an access point with a channel width of 40 MHz? The answer is - and this is an access point that occupies two channels (non-overlapping).
Question: and how many channels with a width of 80 and 160 MHz fit in the 2.4 GHz band?
Answer: No one.
The question is, what affects the width of the channel? I do not know the exact answer to this question, I could not check it.
I know that if the network intersects with other networks, the connection stability will be worse. Channel width of 40 MHz gives more crossovers and worse connection. According to the standard, if there are other working access points around the point, the 40 MHz mode should not be enabled.
Is it true that twice the channel width gives twice the bandwidth?
It seems to be, but it is impossible to verify.
Question: If my access point has three antennas, is it true that it can create three spatial streams and triple the connection speed?
Answer: unknown. It may turn out that out of the three antennas, two can only send, but not receive packets. And the signal speed will be asymmetrical.
Question: So how many megabits does one antenna give?
Answer: You can see here en.wikipedia.org/wiki/IEEE_802.11n-2009#Data_rates
The list is strange and non-linear.
Obviously, the most important parameter is the MCS index, which determines the speed.
Question: Where do these strange speeds come from?
Answer: There is such a thing as HT Capabilities. These are optional chips that can slightly correct the signal. Chips are very useful: SHORT-GI adds a little speed, about 20 Mbps, LDPC, RX STBC, TX STBC add stability (that is, they should reduce ping and packet loss). However, your hardware may simply not support them and still be quite “honest” 802.11n.
Signal strength
The easiest way to deal with poor communications is to fry more power into the transmitter. Wi-Fi has a transmission power of up to 30 dBm.Chapter 3
The solution of the problemFrom all of the above vinaigrette, it would seem that the following conclusion can be drawn: Wi-Fi can implement two “modes” of functioning. “Improving speed” and “Improving quality”.
The first, it would seem, should say: take the most unoccupied channel, channel width 40 MHz, more antennas (preferably 4), and add more Capabilities.
Second - remove everything except the basic n-mode, turn on more power, and turn on those Capabilities that add stability.
Recalling once again the proverb about ravines, we will describe what kind of uneven terrain awaits us when trying to implement plans 1 and 2.
Ravine zero
Although Ralink rt2x00 family chipsets are the most popular chipsets supporting the n standard and are found both in high-end (Cisco) and low-end (TRENDNET) cards, and moreover, they look exactly the same in lspci, they can have radically different functionality, in particular, support only the 2.4 band, only the 5GHz band, or support incomprehensibly limited parts of both bands. What is the difference is a mystery. It's also a mystery why a card with three antennas only supports Rx STBC in two streams. And why don't they both support LDPC.First ravine
There are only three non-overlapping channels in the 2.4 band. We have already spoken on this topic and I will not repeat myself.Second ravine
Not all channels allow you to increase the channel width to 40 MHz, moreover, what channel width the card agrees to depends on the card chipset, card manufacturer, processor load and weather on Mars.The third and largest ravine
Regulatory domainIf the fact that the Wi-Fi standards themselves are a noble vinaigrette was not enough for you to be happy, then rejoice at the fact that every country in the world seeks to infringe and restrict Wi-Fi in all sorts of different ways. In the UK, things are still not so bad, unlike, say, the USA, where the Wi-Fi spectrum is regulated to the point of impossibility.
So, the regulatory domain may require restrictions on the power of the transmitter, on the ability to launch an access point on the channel, on acceptable modulation technologies on the channel, and also require some “spectrum pacification” technologies, such as DFS(dynamic frequency selection), radar detection (which each domain has its own, say, in the Americas almost everywhere offered by the FCC, in Europe it’s different, ETSI), or auto-bw (I don’t know what it is). At the same time, with many of them, the access point does not start.
Many regulatory domains simply ban certain frequencies altogether.
You can set the regulatory domain with the command:
Iw reg set NAME
The regulatory domain can be omitted, but then the system will be guided by the union of all restrictions, that is, the worst possible option.
Fortunately, firstly, data on regulatory domains is publicly available on the core website:
And you can search for them. In principle, it is probably possible to patch the kernel so that it ignores the regulatory domain, but this requires rebuilding the kernel, or at least the crda regulatory daemon.
Fortunately, the iw phy info command displays all the capabilities of our device, taking into account (!) the regulatory domain.
So, how do we fix the state of our Wi-Fi?
First, let's find a country in which Channel 13 is not banned. A path of at least half the frequency will be empty. Well, there are quite a few such countries, although some, without prohibiting it in principle, however, prohibit either the high speed mode n on it, or the creation of an access point in general.
But one channel 13 is not enough for us - because we want a larger signal-to-noise ratio, which means we want to launch a point with a signal strength of 30. We are looking for-looking in CRDA, (2402 - 2482 @ 40), (30) 13 channel, width 40 MHz, signal strength 30. There is such a country, New Zealand.
But what is it, at 5 GHz, DFS is required. In general, this is theoretically a supported configuration, but for some reason it does not work.
An optional task that can be completed by people with advanced social skills:
Gather signatures / movement in support of accelerated relicensing of Wi-Fi bands in the ITU (well, or at least in your country) in general towards expansion. This is quite real, some deputies (and candidates for deputies), thirsting for political points, will be happy to help you.

This is ravine number 4
The access point may not start with DFS, without explanation. So, which regulatory domain should we choose?There is one! The freest country in the world, Venezuela. Its regulatory domain is VE.
A full 13 channels of the 2.4 band, with a power of 30 dBm, and a relatively relaxed 5 GHz band.
Asterisk challenge. If you have a complete disaster in your apartment, even worse than mine, there is a separate, bonus level for you.
Regulatory domain "JP", Japan, allows you to do a unique thing: run an access point on the mythical channel 14. True, only in mode b. (Remember, I said that there are still small differences between b and g?) So if everything is really bad for you, then channel 14 can be a salvation. But then again, it is physically supported by a few client devices and access points. Yes, and the maximum speed of 11 Mbps is somewhat discouraging.
Copy /etc/hostapd/hostapd.conf into two files, hostapd.conf.trendnet24 and hostapd.conf.cisco57
We trivially edit /etc/rc.d/rc.hostapd to run two copies of hostapd.
In the first one, we indicate channel 13. However, we indicate the signal width as 20 MHz (capability 40-INTOLERANT), because, firstly, this way we will be theoretically more stable, and secondly, “law-abiding” access points simply will not start at 40 MHz from -because of the clogged range. Set capability TX-STBC, RX-STBC12. We cry that capabilities LDPC, RX-STBC123 are not supported, and SHORT-GI-40 and SHORT-GI-20, although they are supported and slightly improve speed, but also slightly reduce stability, which means we remove them.
True, for amateurs, you can patch hostapd so that the force_ht40 option appears, but in my case it makes no sense.
If you are in a strange situation when access points turn on and off, then for special gourmets you can rebuild hostapd with the ACS_SURVEY option, and then the point itself will first scan the range and select the least “noisy” channel. Moreover, in theory, it should even be able to move at will from one channel to another. However, this option did not help me, alas :-(.
So, our two points in one case are ready, we start the service:
/etc/rc.d/rc.hostapd start
The points are starting successfully, but ...
But the one that works on the 5.7 range is not visible from the tablet. What the hell is this?
Ravine number 5
The damned regulatory domain works not only on the access point, but also on the receiving device.In particular, my Microsoft Surface Pro 3, although made for the European market, basically does not support the 5.7 band. I had to switch to 5.2, but then at least the 40 MHz mode started up.
Ravine number 6
Everything started up. The points started, 2.4 shows a speed of 130 Mbps (would be SHORT-GI, it would be 144.4). Why a card with three antennas only supports 2 spatial streams is a mystery.Ravine number 7
It started up, and sometimes the ping jumps up to 200, and that's it.And the secret is not at all hidden in the access point. The fact is that according to Microsoft rules, Wi-Fi card drivers themselves must contain software for finding networks and connecting to them. It's like in the good old days, when a 56k modem had to have a dialer with it (which we all changed to Shiva, because the dialer that came with Internet Explorer 3.0 was too terrible) or the ADSL modem had to have a client PPPoE.
But even those who do not have a standard utility (that is, everyone in the world!), Microsoft took care of it by making the so-called “Wi-Fi auto-configuration”. This auto-configuration cheerfully spits on the fact that we are already connected to the network, and scans the range every X seconds. Windows 10 doesn't even have a "refresh networks" button. Works fine as long as there are two or three networks around. And when there are 44 of them, the system freezes and gives out a few seconds of 400 ping.
"Autoconfiguration" can be disabled with the command:
Netsh wlan set autoconfig enabled=no interface="???????????? ????" pause
Personally, I even made myself two batch files on the desktop “enable autoscan” and “disable autoscan”.
Yes, please note that if you have Russian Windows, then most likely the network interface will have a name in Russian in the IBM CP866 encoding.
Summery
I've rolled out a rather long sheet of text, and I should have ended it with a brief summary of the most important things:1.
The access point can only work in one range: 2.4 or 5.2 or 5.7. Choose carefully.
2.
The best regulatory domain is VE.
3.
The commands iw phy info, iw reg get will show you what you can do.
4.
Channel 13 is usually empty.
5.
ACS_SURVEY, 20MHz channel width, TX-STBC, RX-STBC123 will improve signal quality.
6.
40 MHz, more antennas, SHORT-GI will increase the speed.
7.
hostapd -dddtK allows you to run hostapd in debug mode.
8.
For amateurs, you can rebuild the core and CRDA, increasing the signal strength and removing the restrictions of the regulatory domain.
9.
Auto-discovery of Wi-Fi in Windows is disabled with the command netsh wlan set autoconfig enabled=no interface="???????????? ????"
10
. Microsoft Surface Pro 3 does not support the 5.7 GHz band.
Afterword
I found most of the materials used in writing this guide either in google or in mana for iw, hostapd, hostapd_cli.In fact, the problem IS NOT SOLVED. At times, the ping still jumps to 400 and stays at that level, even for the “empty” 5.2 GHz band. Therefore:
I am looking for a Wi-Fi range spectrum analyzer in Moscow, equipped with an operator, with whom I could check what the problem is, and whether it is that there is a very important and secret military institution nearby that no one knows about.
P.S
Wi-Fi operates at frequencies from 2 GHz to 60 GHz (less common formats). This gives us a wavelength of 150mm to 5mm. (Why do we even measure radio in frequencies and not in wavelengths? It’s also more convenient!) I, in general, have an idea, buy wallpaper from a quarter-wavelength metal mesh (1 mm is enough) and make a Faraday cage to guarantee isolate yourself from neighboring Wi-Fi, and at the same time from all other radio equipment, such as DECT phones, microwaves and traffic radars (24 GHz). One problem is that it will block GSM / UMTS / LTE phones, but you can allocate a stationary charging point for them by the window.I will be glad to answer your questions in the comments.
Set up wireless network...
It is today that we are witnessing the rapid development and popularization of wireless networks. Until recently, the built-in Wi-Fi controller in a laptop was considered a waste of money, and it was almost impossible to find a use for it, but today many public institutions, including cafes, restaurants, libraries, hotels and airports provide wireless Internet access, providing the user with fast and inexpensive (and often even free) access to the World Wide Web.
Today on the net you can find a lot of reviews on various wireless equipment, but they all talk about the equipment itself, and do not answer the main question, for many of us, how to connect everything?
In this series of articles, we will try to remedy the situation, and using the example of typical LevelOne and X-net equipment, kindly provided by Svega Computer and Atlantic Computers, we will tell you how to quickly and efficiently organize a high-performance wireless network with Internet access at home.
Easy and cheap wireless connection
So, let's say you have a desktop computer at home with a permanent Internet connection, and a laptop that you would like to connect to the local network with the desktop computer, as well as provide shared Internet access. To date, there are several solutions to this problem, but not all of them can be called simple and affordable, especially for users who do not have special network knowledge.
In our opinion, the simplest and most affordable way is to use two Wi-Fi adapters (the so-called Ad-Hoc or point-to-point connection) that work according to the 802.11b standard and provide an exchange rate of 11 Mbit / s, which is quite enough for a normal work.
For our experiments, we used the WNC-0101 USB USB controller and the Realtek RTL 8180 Wireless LAN controller built into the MaxSelect Mission Hammer Wide, Mini laptop.
Why USB Wi-Fi controller? It really doesn't matter which controller you use, you can choose PCI, PCMCIA, CF or SD. All of them provide approximately the same level of functionality and communication quality. The main advantage of the USB controller is the ease of installation and versatility of use. In other words, to install the controller, there is no need to open the computer, and you can use it not only with a regular desktop computer, but also with an old laptop that does not have a built-in Wi-Fi controller, as well as with various compact Barebone platforms, where it is not always possible to find free PCI slot.

As for the shortcomings of USB Wi-Fi controllers, we can note the built-in antenna, which somewhat limits the range, however, given that we are talking about a home network, where a small range of a wireless network is not critical, we do not pay attention to this feature.
Installation Features…
First of all, we recommend installing the driver and utility for setting parameters and monitoring the connection, and only then connect the USB Wi-Fi controller LevelOne WNC -0101 USB. These recommendations apply not only to the used LevelOne controller, but also to any other USB Wi-Fi controllers.
Once you have installed the USB Wi-Fi controller, you can start setting up the network. There are two ways to do this. In the first case, you can use your own IEEE 802.11b WPC Utility(USB), and in the second case, you can use Windows XP tools. Moreover, it is important to note that before the appearance of the second service pack, which we strongly recommend installing if you really care about the security and stability of your computer, the tools built into XP somewhat limited the possibilities of wireless connection, although they were quite efficient. In the second service pack, Microsoft has significantly expanded the capabilities and significantly simplified the work with wireless connections.
In order for you to fully understand the configuration features, we present both methods and start with the tools built into XP.

So, first of all, we open the properties of the network environment, which displays all the network connections available on your computer. As you can see, there are many different network wired and wireless controllers installed in our computer, but for now we are only interested in “wireless connection 3”, which is based on the LevelOne WNC-0101 USB controller. Now we open the properties of this connection, where we are interested in the second tab "Wireless networks". It is here that we will make all the settings for our wireless network.

First of all, pay attention to the checked box in the topmost item “Use Windows to configure the network”, this option allows you to choose which tools will be configured.
In the next step, you must create your first wireless network, for which we press the button add in the "Preferred networks" section, where you need to enter the name of your network (we chose the name MyHome), as well as set some special parameters that provide a certain level of security for your wireless network.

To simplify our first connection, we decided to use an open network without enabling data encryption. As you understand, such a network does not provide sufficient security for your data, but for a home connection such as Ad - Hoc or computer-to-computer, it is quite sufficient.

Windows XP tools allow you to create a wireless network using a special wizard available in the Available Networks section. To do this, click the "Wireless networks" button and in the opened wireless network manager, click the "Set up a wireless network" button. The main difference of this wizard is the ability to save the wireless network settings on a Flash disk, which greatly simplifies the transfer of the network configuration to other computers on your network, but for our situation, when we need to connect two computers, this feature is not relevant.

A little later we will return to this manager, but for now we will consider the second configuration method using the utility supplied with the LevelOne WNC -0101 USB controller. Recall that in order to allow the use of a proprietary utility, you must uncheck the “Use Windows to configure the network” box in the “Wireless Networks” tab.

The utility includes a slightly larger set of features than the Windows tools. There are six tabs here. The first tab "LAN Status" displays all the wireless networks found around, in our case there are none yet, and also shows the strength and quality of the signal (it is also not displayed with an Ad - Hoc connection).

You can create a new network by opening the "Setting" tab. As you can see, everything here is very similar to what we saw above, however, there are several features that make working in wireless networks much more convenient.

First of all, pay attention to the ability to create up to five profiles that allow you to quickly change connection settings. So, we create the first profile, initially we specify the network name (SSID), network type (AD - Hoc). The communication channel used and the country can be left unchanged. Additional connection properties are available in the Advance window. Here the user can select the transfer speed, power saving mode (important for laptops), as well as the encryption mode.

The remaining bookmarks perform informational functions and are not particularly in demand if everything is working fine.
In principle, at this point, the first stage of setting up a desktop computer can be considered complete, and it's time to set up a wireless network on a laptop.

In general, this process is completely identical to the one described above, and we will not repeat it, we only recall that depending on the Wi-Fi controller used, the functionality of the setup utility may differ, but the basic settings remain identical.
Establishing a connection
It's time to establish a connection between the two computers. To do this, you can use both the proprietary utility and the Windows XP network connection manager, which we said a few words about above, but before doing this, reboot both computers, which will allow you to automatically connect two computers, as evidenced by the icon in the system tray of the desktop. table.

If the connection fails, open the controller's Wi-Fi configuration utility or the Windows XP network connection manager. Personally, we recommend using the manager. It provides an easier and more intuitive wireless experience.

The main window of the manager displays a list of detected networks. If you see something similar to our screenshot, then we can assume that you have almost reached the main goal - to connect two computers to the network.
If this is not the case, then we recommend that you click the "Update network list" button. If nothing happened in this case, check if the second computer is turned on, if the Wi-Fi controller is working, and if there is an error in setting up the wireless connection.
Last steps...
So, we have come to the final stage of connecting computers to a network - setting up an IP connection, setting up a gateway and sharing files and printers. Despite such a complex name for the upcoming procedure, everything is done very simply, for which special thanks to the developers of Windows XP.

However, before proceeding with the setup, we recommend that you pay attention to some hidden pitfalls that we encountered when we first set up a wireless network.
If your desktop computer is connected to a dedicated Internet channel and uses an internal IP address (for example, 192.168.0.0…255 or some other internal range), we recommend disconnecting the network cable. This is because during setup, your wireless controller on your desktop computer will be assigned the address 192.168.0.1, which is usually used on the internal network, which will cause an address conflict and you will not be able to configure the gateway.
The second "stone" that made us mess with setting up a wireless connection is the firewall built into Panda Internet Security. For the wireless network to work, you need to configure the firewall accordingly, both on the desktop computer and on the laptop, or simply temporarily disable it. By the way, the firewall built into the second service pack does not cause any problems.
So, let's run the wizard on a desktop computer that has an Internet connection. After answering a couple of trivial questions, you need to perform some actions that tell the wizard which connection is used for what.

First you need to check the box "ignore disconnected network equipment", which will allow you to use the wired controller disconnected from the network. In the next window, you must select the role of this computer in your network.

Considering that our desktop computer has a permanent connection to the external network, and the laptop will connect to the Internet through it, we choose the first connection method.
In the next step, you specify which connection is used to connect to the Internet. In our case, this is "Local Area Connection".

Next, select which connections are used to connect to other computers on the network. Note that you can combine wired and wireless connections here. In our case, we chose only "Wireless Connection 3" which is based on the LevelOne WNC -0101 USB controller.

In the next two windows, you specify the computer name and description (optional) and the workgroup name.

Please note that the computers on your local network must belong to the same workgroup, otherwise you will not be able to see them on the network.

And finally, the last window allows you to enable or disable file and printer sharing.

After clicking the "Next" button, the wizard will start configuring the IP connection parameters, as well as sharing and security. If you have done everything correctly, a final screen will open, in which you will be asked to save the settings or simply exit the wizard, which we will gladly do.

After configuration, you will find some changes in the network connection settings.

So, in the "Local Area Connections" properties in the "Advanced" tab, all the checkboxes will be checked, and the connections for the home network will be defined.

And in the TCP / IP properties of the Wireless Connection 3 protocol, a fixed IP address and subnet mask will be set.

Now you can proceed to run the wizard on the laptop. Here everything happens much faster and you only need to establish the second type of connection. The wizard will do the rest for you.

That's it, the setup process can be considered complete at this point, and you, as a full-fledged owner of your home wireless network, can run any Internet applications, including games. In addition, you can easily work with disks on another computer, as well as printers, providing wireless printing from a laptop located in another room.
A few words about the speed and range of the wireless network ...
As we said above, for our first wireless network, we used controllers operating according to the 802.11b standard with a maximum exchange rate of 11 Mbit / s. Of course, by today's times, this is not much, and against the background of modern controllers operating under the 802.11 g and 802.11 Super G protocols, providing an exchange rate of 54 Mbit / s and 108 Mbit / s, it does not look very good. However, for the first experience, this solution is sufficient, allowing you to achieve quite good capabilities without having to deal with some specific features of a high-speed connection that we still have to tinker with in the future.
As for the actual exchange rate, to study it, we used the ICB 2000 program, which allows you to measure network traffic. Moreover, we are not interested in the speed of artificially generated traffic, but in the speed of the actual transfer of files and other information.
So, first we will see what our wireless network is capable of when copying a large file from a desktop computer to a laptop while simultaneously viewing a movie recorded on a desktop computer on-line on a laptop. In this mode, we load the wireless channel to the maximum.

As you can see, the maximum wireless bandwidth in this mode is 4636 Kb/s on average. It is very important to note here that at the same time we did not observe any slowdowns when watching a movie, which allows us to conclude that in small home networks, the capabilities of 802.11b networks are quite enough.
If you start copying in the opposite direction, i.e. in Download mode for a desktop computer, then the maximum bandwidth of our channel will be slightly higher - 4984 Kb / s with a peak value of 5305 Kb / s.

If, while copying a file from a desktop computer to a laptop, we run the same task, but in the opposite direction, the speed will drop somewhat. Moreover, the speed in the Upload mode does not drop significantly, but in the Download mode we observe a noticeable decrease in performance.

And finally, let's see what happens when we run any network application that generates a load-balanced load on the channel. Here we just started watching a movie recorded on a desktop computer on a laptop.

As you can see, in this mode, the load on the channel is not so significant that it allows you to run network browsing on a couple more computers without any problems. This is what explains the lack of slowdowns when watching a movie with parallel copying of the file. As for the range, in such a network it is not very large, and depends on the configuration of the room. In fact, in an ordinary apartment or small office, everything will work well.
How many computers can be connected in such a wireless network?
A pleasant surprise for many of you will be that a simple Ad - Hoc network can include several computers at once, which can be easily connected to each other and provide easy access to the Internet. However, remember that an increase in the number of computers simultaneously working on the network significantly reduces network performance, which is due to the need to transfer all data through the desktop computer, which in our case is the gateway.
Conclusion…
So, we hope that the above detailed recommendations will simplify your first experience in creating a wireless home network. Despite the external complexity of the process, everything turned out to be more than simple. However, we cannot claim that the presented solution is universal and will be equally correct for all cases. As experience shows, almost every installation of a wireless network with new equipment raises some questions, especially for users who do not have special training. The main thing is that you must clearly understand and imagine the sequence of actions that should lead to the successful launch of the wireless network. In the next article, we will introduce you to equipment that can significantly increase the performance of your home network.
Not so long ago, a computer, and even more so a laptop, was a luxury. Today, almost every family has a computer or laptop, and in many families, almost every family member has these devices. Each such device must have access to the Internet, since a computer without the Internet is a “box”. With the development of technology, in order to divide Internet traffic into several devices, it is no longer necessary to connect a separate cable to each device, everything can be done over the air - using Wi-Fi technology.
The content of the article:
Benefits of Wi-Fi
Before we talk about setting up a Wi-Fi network at home, let's talk about the tasks and advantages of this technology. So, if you have a need to divide the existing Internet channel into several devices, then you need a router. If you want to share the Internet channel by connecting devices without using wires, then a Wi-Fi router will help you with this. We have already told you about that, and therefore, before buying it, we recommend that you read this article again. A Wi-Fi router is a great option if you have devices that support Wi-Fi networks. Thus, by installing a Wi-Fi router in the most central point, you can provide Wi-Fi coverage throughout the apartment, which is very convenient, because you will not need to pull extra wires. If your computer does not have a Wi-Fi adapter, then this issue can be solved in two ways: install a Wi-Fi router in the room where the computer is located, or purchase a Wi-Fi adapter. A Wi-Fi adapter is a small device in the form of a flash drive or in the form of a card inserted into a PCI slot.In view of the fact that in almost every family there is a need to install a Wi-Fi router, we will tell you how to set it up yourself, without calling the wizard.
Setting up a Wi-Fi router
To configure the router, it must be connected via cable to a computer or laptop. The connection diagram must be displayed in the instructions. We unpack the router, fasten the antennas to it, then connect one part of the network cable (which comes with the kit) to the router, and the other to the computer (laptop). Then we connect the power of the router and after that we connect the network cable of the Internet provider to it.How to enter the router menu
Absolutely all Wi-Fi routers are configured using the WEB interface, this is a kind of site with settings. That is, in order to configure the router, you need to open a page with its settings in the browser. To do this, enter "192.168.1.1" in the address bar of the browser and press the "Enter" key. After that, a window will appear on the screen in which you will need to enter your login and password to access the router settings. Standard (by default) login and password from the router settings menu: "admin" - in small letters. After entering, press "OK" and get into the menu.

Flashing a Wi-Fi router
So, in order to set up a Wi-Fi router, you first need to reflash it. If you are a fairly experienced person, and you know what and how, then now we will tell you what you need to do for this. If you don’t really like to understand all the intricacies of computer technology, then you can do without flashing the router. Firmware is a kind of operating system of the router on which its work is based.
Why do you need a flashing? Re-flashing the router is necessary in order to ensure the normal and high-quality operation of the device. As a rule, each Wi-Fi router from the moment of release until the moment of discontinuation has the same firmware version. This firmware passes only internal tests, but when the device goes on mass sale, users find all the problems in the operation of the device, in various situations. Therefore, the "native" firmware is not perfect and you may have problems in the operation of the device: low speed, freezes, problems with Wi-Fi, etc. That is why it is better to install a new firmware version.
In order to reflash a Wi-Fi router, you need to download the firmware file. You can download it, of course, from the official website of the manufacturer. To do this, on the website of the device manufacturer, find the model of your Wi-Fi router, and click on the “Downloads” tab, this is where the list of available firmware should be located. Some manufacturers may send you to an FTP server where the firmware is stored. But do not rush to download the latest version of the firmware, first read the forums where users who installed this firmware wrote a review about its work and concluded whether it is worth installing it or not.
After downloading the archive with the firmware, unzip it and copy the firmware file to the downloads folder. In the router menu, go to the Firmware section and in the available field, specify the path to the new firmware for the router. You can find more detailed instructions on how to reflash the router in the instructions for the device.
After flashing, go to the Network / IPConfig / Network menu (depending on the model of your router) and first make the provider settings.

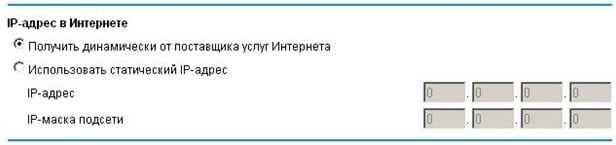
WAN connection type
- Dynamic IP / DHCP / Dynamic IP - select if the provider provides a dynamic IP;
- Static ip / Statistical IP address - select if the provider is built on a local network, where to access the Internet you need to enter an IP address, subnet mask and Gateway (Gatway).
- PPPoE - select if you need to enter a username and password to access the Internet.
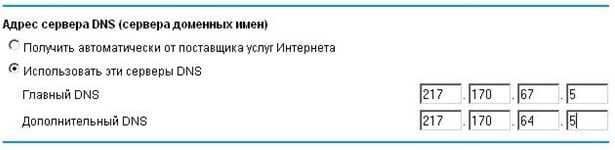
DNS 1 and DNS 2 - it is advisable to leave them installed automatically, but if the provider requires them to be manually installed (which is very rare), then we enter the primary and secondary DNS. It is not always necessary to enter the provider's DNS in the network settings, sometimes external DNS work better than the provider's.
Then go to the Wireless tab, which contains the Wi-Fi settings.
How to set up a Wi-Fi network
Network name (SSID)
The network name is the name of your Wi-Fi router that will be displayed when the device searches for a network to connect to Wi-Fi. We recommend that you set the name as original as possible to avoid overlaps. If there are 2 devices with the same names in your network, then the Wi-Fi connection may not work correctly.
Channel
This is the frequency channel over which data will be transmitted. Pay special attention to this setting, as it may cause you to experience low Wi-Fi speeds. Why? Each channel has its own, so to speak, data transfer volumes. The more devices you have connected via Wi-Fi, the lower the Internet speed for each device - the same goes for the channel, the more devices use the same channel, the less its bandwidth. Therefore, even if you have a high Internet connection speed, and the Wi-Fi channel is overloaded, the Wi-Fi connection speed will be very low.
If you do not have such advanced neighbors, then this parameter can be left at the value of "Auto". It is very easy to check the Wi-Fi activity of neighbors - call up the Wi-Fi connection menu list and see the number of Wi-Fi routers that are available in your apartment: if there are few of them, then the channel is enough, if there are many, then it is better to install it manually.
In view of the fact that "Auto" selects the 6th or 7th channels, then with manual selection it is necessary to select the channels that are at the beginning. That is, if in the future, the connection speed via Wi-Fi has dropped, and via cable it corresponds to the declared one, then it is possible that the whole problem lies in the Wi-Fi channel.

Mode (Wireless Mode)
This setting sets the wireless network standard. 2 factors depend on the wireless network standard: the ability to work in it with older types of devices and the speed of Wi-Fi. That is, Wi-Fi has its own standards of operation, and to make it more clear to you, let's look at an example. In cellular communications, at first the Internet was transmitted via WAP, then via GPRS, then via EDGE, etc., with each new type, the data transfer speed also grew - in our situation, everything is the same. The further down the alphabet letter the communication standard is, the higher the data rate it supports. But here it is necessary to take into account one more point: not all devices released a long time ago and supporting work in Wi-Fi networks support the latest type of connection - and this must be taken into account.
When choosing a wireless connection type, set the type that will be supported by all your Wi-Fi devices. Devices of a new type can work with older types, but not vice versa. But do not be upset, most modern Wi-Fi routers can work with several standards - which is very convenient, for this, set the value to "b / g / n" (if any).
Channel Width
The channel width is specified in megahertz. We recommend leaving this parameter on the “Auto” parameter, or setting its maximum value.
Maximum data transfer rate
This parameter sets the maximum data transfer rate - rate limit. Of course, it is best to set this parameter to the maximum value. If you are the main user of the Internet, and you need a high data transfer rate over a network cable on your computer, then you can cut the Wi-Fi speed in this way.
Encryption type
Another important parameter when setting up a Wi-Fi router is the type of encryption of transmitted data. The stronger the type of encryption, the more secure your data will be transmitted. WPA-PSK/WPA2-PSK is currently the best encryption type. But here you should also pay attention to the fact that not all devices support this type of encryption, and therefore it is possible that when choosing it, you will need to find a “golden mean” for all devices.

How to set up Wi-Fi on a computer and laptop
Let's briefly describe how to set up Wi-Fi on Windows 7 and Windows 8. In order to set up Wi-Fi on a laptop or computer, you need to select your Wi-Fi router in the list of Wi-Fi devices, which you gave the original name. Then we click on his name 2 times with the mouse, and we are prompted to enter a password - we enter the password, it is checked, and if you entered everything correctly, the device connects to Wi-Fi. After that, we recommend checking both over the network and over Wi-Fi. Please note that Wi-Fi speed may be limited by the bandwidth of the router. Therefore, it may differ from that which is available on the LAN.Sometimes, to connect a laptop via Wi-Fi, you need to separately enable the Wi-Fi module. As a rule, on laptops, the corresponding button is responsible for this, it can be either separate or combined with the F7 key.
You can learn more about setting up a Wi-Fi connection in the video below.
This article will help answer the following questions: how to set up hotspot, how to set up a router and bring clarity. According to the manufacturers of wi-fi equipment, setting up a wireless network (WLAN - Wireless Local Area Network) is a matter of minutes. The button is pressed and the device is connecting. In reality, wi-fi routers are confusing even for experienced PC users. Most are happy with the fact that there is a signal at all - reliability is usually forgotten. In this article, you will learn how to set up a Wi-Fi hotspot, how to set up a Wi-Fi router, and how to make a reliable wireless connection to protect your network from unwanted guests.
I want to say right away that new detailed material has appeared on setting up the router:. I recommend using it first of all to set up a wi-fi router.
Which Wi-Fi router or access point to choose
Choosing a Wi-Fi router. The stumbling block for multimedia transmission is always the Wi-Fi standard. You can quickly transfer large files or watch HD video wirelessly only if it complies with the 802.11n standard, which supports speeds up to 300 Mbps. I also advise you to read about the new wireless network standard - in order to buy a device with a reserve for the future. If this is not necessary, then choose any router from a well-known manufacturer ( D-Link, TP-Link, Asus or Netgear) that comply with the 802.11n standard - this is more than enough for any high-speed Internet connection.
WiFi adapters. Users who use modern laptops or PCs with an integrated wireless network adapter do not need additional equipment, and owners of older laptops need to take care of Wi-Fi modules on the USB bus or Wi-Fi Card-Bus adapters.
How to locate a Wi-Fi hotspot or Wi-Fi router
All three Wi-Fi networking standards typically operate at 2.4 GHz. As a result, several problems arise. One of them boils down to the fact that not only Wi-Fi equipment works in this frequency range. For example, microwave ovens, cordless phones, and wireless extenders also use this frequency, which increases the level of interference. Another problem is related to the environment of the signal passage: the human body, reinforced concrete structures degrade the quality of the signal if they are located along its route. In order for the signal to be available throughout the entire room, it is important to choose the right place. The connection works best if the router is mounted on the wall as high as possible. In addition, the router should not be located directly behind a computer or other device that has strong radiation or interferes with radio waves due to the metal case. The correct location of the antennas of the router is also critical. In most cases, you can get more coverage by pointing them vertically.
Connecting and configuring a Wi-Fi router (access point) for a local (internal) network
Connect the computer and the router with a network cable (usually use sockets for an external network, there are usually 3-5 of them, they are located nearby and signed. Make sure that your computer is connected to your wi-fi router (the connection icon in the taskbar tray lights up) .
- IP address: 192.168.0.2
- Subnet mask: 255.255.255.0
- Default gateway: 192.168.0.1
- DNS: 192.168.0.1
If you found other options in the manual, set them. Open a command prompt ( Start - Run- in the window that opens, write "cmd" for Windows XP or click Start and type "cmd" in the search bar). Next, in the command line that opens, write: ping 192.168.0.1 . If packets come from 192.168.0.1, then you did everything right. If there is no answer and we see messages about exceeding the waiting limit, it is worth trying to change the IP 192.168.0.1 and 192.168.0.2 to 192.168.1.1 and 192.168.1.2 respectively, and then try to “ping” the address - 192.168.1.1 If you still fail, then refer to the manual to understand what IP address the router accepts on the internal interface.
I also recommend that you check once again whether the network cable on the router is plugged into the socket, whether a crossover cable is used. IN wifi router connection guide it should be written how to get into the web interface to manage the router, if you can’t find this section or the manual itself is missing, you should check the addresses http://192.168.1.1 or 192.168.0.1 , depending on which address we managed to ping. in your computer's browser. If you have already tried to connect it to the router, then you must first reset the settings with the button "Reset" on the back. It is also worth checking the same addresses but with a secure protocol https://, instead of http://
On the page that opens, you will be asked to enter your login and password, if nothing is indicated in the instructions for connecting the wi-fi router, then you should try the admin / admin or admin / password pair - these are the most common pairs and they are found in almost all popular router models. After entering the administration mode, select the Russian language in the interface settings section so that everything becomes intuitive, if it is present.
Most often, Wi-Fi routers allow packet forwarding on the intranet interface, so you can already turn on additional PCs and connect them through other internal network sockets and start using the internal network.
How to set up a Wi-Fi router
How to enter data to access the Internet connection, we will consider below, using the example of one of the Wi-Fi routers, but for now let's go to the "Wireless Settings" settings section ( wireless network setup) or to the section “Wi Fi”, “Wireless”, etc.
Now give the name of your home Wi-Fi network in "Name (SSID)". Under this name, the wireless network will be displayed in the list of available networks on the other device. Select your region (Europe - the American installation has a long range, which, however, is prohibited in our country). In the "Channel" column, set the value to "Auto" - then the Wi-Fi router will analyze the air and will use the channel with the least amount of interference. Confirm the settings by clicking "Apply".
Wireless security
The network is installed, now it's up to the choice of protection. Without a strong password, anyone can access the Internet through your connection. There are three main encryption methods in protecting a wi-fi network: WEP, WPA and WPA2. All of them are vulnerable in one way or another, but with my help, your network will be quite reliably protected from hackers. Encryption using WEP is extremely insecure - we recommend that you do not use it. WPA (Wi-Fi Protected Access) encryption, which is based on the AES encryption method, is fairly secure and difficult to crack. To select keys, a hacker will need many years or a computer that is orders of magnitude faster than current PCs.
Better security is offered by WPA2. True, hackers were able to find a loophole here too, but the costs of hacking are too high. However, all these protection methods require a dedicated authorization server (RADIUS), which is not applicable in a home network or a small office network. They are encrypted using WPA and WPA2 with predefined keys. To use them, on the "Wireless Settings" tab, activate "WPA-PSK (TKIP)" or "WPA2-PSK (AES)". When prompted for "Security Encryption", set a password - it is not recommended to use less than 15 characters for it. Confirm the entry by clicking on "Apply".
Optional Wi-Fi router setup
Each device on the network has its own MAC (Media Access Control) network address. In the router, you should register the addresses of only devices you know - others should not have access to the router. To do this, click on the "Advanced" menu item on the "Wireless Settings" tab and select "Setup Access List". After that, you will get a list of connected devices. It is easy to find out the MAC address of a wifi module on a laptop or a wifi network card on a PC - in the command line, type “ ipconfig /all” Select the computers for which you want to open access, and click on "Add" (Add). Now check the box next to "Turn Access Control On", click no "Apply" - and the hacker-proof network is ready. Do not forget that all this is best done after you set up a wireless connection on client computers.
Restart the Wi-Fi router through the web interface and try to set up a network on your device using the following settings:
IP– from the range of free addresses
Mask – 255.255.255.0
getway – 192.168.(0-1).1
Setting up the Internet on a Wi-Fi router or setting up an external network

If we need to wire the Internet over the internal network, we need to connect the network cable with the “Internet” to the external interface on the wi-fi router (the external interface is usually located a little away from the others and is signed accordingly WAN)
After that, in the router settings, you need to specify the settings for the external interface of your provider: usually they are in the contract, or call technical support. You should also not forget about DNS - the router probably has a caching DNS server or, in extreme cases, a DNS tunnel, configure it. It is also worth checking whether the exchange of packets between interfaces is allowed, if so, then the Internet most likely already exists in your internal network.
By the way, I want to note that the latest models of wi-fi routers and some of the previous ones (Asus, for example) have the ability to work with the PPPoE protocol - which has recently become more and more common among providers, so at the end of the article you will find a step-by-step instructions for setting up a wi-fi router with a connection via the PPPoE protocol . If your Internet is exactly like this, then make sure that you have a router with PPPoE support. On I have described the main types of Internet connections so that you can determine yours.
Gh34EwF-MB4
P.S. Let me remind you once again about the “cherished button” that answers the question “ How to reset the password on the router, if I forgot the old one. Each router has a “Reset” button - after pressing it while the router is running, it reboots and all settings are set to the original ones.
Setting up a wi-fi router. Troubleshooting a Wi-Fi network
Why doesn't Wi-Fi want to transfer data? You are connecting to Wi-Fi, but the browser cannot display the site. Let's find ways to solve this WLAN problem:
Weak signal Wi-Fi connection. Sometimes a WLAN transmits data one and a half, two times slower and the signal is always bad, regardless of the location of the antenna. Cause: Your network is being covered by another WLAN that operates on the same frequency. In order for several radio networks to exist side by side without overlapping each other, the 802.11b / g standard provides 13 channels at a frequency of 2.4 GHz. Many routers are set to channels eleven or six. With free app NetStumbler you can find and recognize neighboring WLANs and find out which channels they operate on. Download the app from the official website and start searching. After that, you will see the channels of the networks around you. Now, through the web configuration of the router, set your WLAN to one of the channels that is not used on this network and check if the signal has improved.
How to increase the range of a Wi-Fi network. If the range of the Wi-Fi router is insufficient, WDS technology (Wireless Distribution System - distributed wireless system) is usually used. It allows Wi-Fi access points to establish a connection not only with clients, but also with each other. Each of them receives a signal from the other and transmits it further. However, this increase in range translates into the cost of another set of access point equipment. The next drawback: the access point must provide simultaneous connection to both the network and the client - this reduces the efficiency by half. directed.
The Wi-Fi router or Wi-Fi hotspot is losing connection. The network is functioning normally, but the connection is constantly broken. The problem is most likely the poor quality of the power supply. Even a small voltage drop is enough for the router to lose connection. Solution: Get a small uninterruptible power supply and connect the router through it. If this happens infrequently, most users turn off / on the device, but this is not an option.
Disconnected wi-fi connection. When the wi-fi router and computer adapter are made by different manufacturers, it may cause some problems. As a rule, updating the software helps here. Find the latest version on the vendor's website and install it through the configuration menu. Especially often this problem is solved by updating the firmware on D-Link access points and routers.
Common mistakes and setting up a Wi-Fi router

Wrong IP configuration. In order for two network communication components to share files, each needs its own IP address. This network data is distributed by the DHCP (Dynamic Host Configuration Protocol) server in the router (do not forget to check in the router's web interface that the DHCP server is enabled). Open Control Panel and select Internet Connection. Select "Settings" from the WLAN connection menu. Next, double-click on "Internet Protocol" (TCP/IP) and activate the "Obtain an IP address automatically" option. Confirm by double-clicking on "OK". If you have several devices that can be DHCP servers, there may be a conflict between them. This leads to real chaos. Use the DHCP Find app to track down which device is causing the problem. It reports the MAC addresses of the DHCP server. MAC addresses are usually written on the underside of devices. In this way, you can quickly identify the troublemaker and disable the DHCP server in it. If the connection is still not functioning, the proxy server settings in the browser may be to blame. Set up your browser: In Internet Explorer, click on "Tools | Internet Options" and go to "Connections". In the "LAN Settings" section, uncheck all items, including "Auto-detect settings". Other browsers such as Firefox, Chrome, or Opera have similar names for these features.
Programs for setting up and optimizing a Wi-Fi network (WLAN)
DHCPfind — looking for wlan troublemakers
PuTTY — configures WLAN routers
EasyWi— firadar — displays all WLAN connections in the area
Wireshark — finds insecure data
networkshareBrowser — shows all free networks
Wlandscape — creates a WLAN coverage map
WiFi router Netgear WNR3500L. Easy setup

On the example of the Chehov.NET provider
- We connect the cable from the provider to the router (the WAN port is yellow).
- We take another cable (twisted pair crimped from 2 sides). We connect one end of the cable to the router (LAN port - orange), and the other to the computer.
- We connect the router to the outlet. We turn it on.
- Insert the disk from the kit into the drive (Russian interface). Set up step by step. Everything is very clear.
- Next, watch the video (below) and set up a PPPoE connection: go to the web interface - www.routerlogin.net with a pair of admin | password, select the type of connection - PPPoE, set the login and password from the contract, IP automatically, change the password for access to the router. Apply the settings, reboot - you're done!
9HQhe6H92iU
How to set up a NETGEAR JWNR2000 Wi-Fi router with a PPPoE connection
Go to the Internet Explorer, Mozilla, Opera, Safari browser and type 192.168.0.1 in the address bar. In the window that appears, in the "Username" field, enter admin, in the "Password" field, enter password and click the "OK" button.
After this procedure, the router menu will appear:

Setting up a PPPoE connection
Click the "OK" button in fig. higher. "Basic settings" will appear (in the menu on the left it is: Installation - Basic settings).
To the question "Do I need to enter connection information when connecting to the Internet?" answer "Yes":

In the "Internet Service Provider" select "Other" (which corresponds to the type of connection PPPoE):
Connection mode - connection establishment mode. "Always on" for a permanent connection. “Connection on demand” - establishes a connection when necessary - that is, when there is traffic directed to the Internet, the device will establish a connection, and if there is no activity for more than the time specified in “Idle time before disconnecting (in minutes)”, it will disconnect. If "Manual connection" is selected, the connection is established and terminated manually

"IP address on the Internet" leave "Obtain dynamically from an Internet service provider" , if the IP is not given to you by the provider (static) , like the rest of the parameters (everything should be in the contract):
DNS server addresses can be specified manually, if there are any from the provider, or leave the receipt automatically:
Master DNS: xxx.xxx.xx.x
Secondary DNS: xxx.xxx.xx.x
"MAC address of the router" is left by default:

Setting up wi-fi and security with an encryption key

Configuring the security of a wi-fi network using filtering by MAC address

Configuring the Netgear WG602 Access Point

Setting up a wi-fi access point Netgear WG602 is quite simple . Before starting the connection, hold down the "Reset" button, which is located on the back of the access point for 20 seconds to reset all settings to default. Remember that if you use an Internet connection via a login-password pair, then you need an access point with support for the PPPoE protocol, the connection of which is described above, the Netgear WG602 access point cannot be used with this type of Internet connection.
We connect the Netgear wg602 access point to the network card of the computer with a twisted pair cable. In the connection settings of the network adapter (card) of the computer, we prescribe IP 192.168.0.2, mask 255.255.255.0, deleting the previous settings, if any, but you can also use a second network card on the motherboard to configure an access point.
Open a browser to connect to the web interface of the access point, write in the address bar 192.168.0.227, a dialog box should appear where you need to enter login: admin password: password (setting data is written on the bottom cover of your access point)
We go to the Wireless Settings menu, type an arbitrary network name - Wireless Network Name (SSID) and region (Country / Region), click "Apply".


Now we need to go to IP settings and “drive in” the provider settings from the contract by unchecking DHCP. This checkbox will not need to be unchecked only for those whose provider assigns an IP automatically or you use a wired router (switch) with an IP assigned to it. Such routers are necessary to connect several devices in the apartment. Leave all other settings as default.

We reboot the access point (go to the Reboot AP menu section), remove the cable from the computer's network card:
1) If you have an Internet cable connected to the aforementioned switch with an assigned IP provider, then the end of the cable that you pulled out of the computer, insert into the switch and connect to the newly made Wi-Fi network using any device that supports this wireless technology, entering only a password (for example, a smartphone). Skip this paragraph if you are not using such a router.
2) If you have only a cable from the provider in your apartment (house, office), then also remove the end of the cable pulled out of the computer from the access point and connect the cable of the Internet provider to it. Check network health.
Installing Wi-Fi will make your life better!
Do you use the Internet every day and can't imagine your life without it? Are you used to using it to find the right information, communicate, make purchases? Our company is pleased to offer you such a service as installing a wifi router at home or in an apartment in Moscow. The prices for our services will please you! In addition, we offer to connect interactive (digital) TV and enjoy your favorite TV channels in HD quality.
Prices for popular services:
| Type of work | Cost, rub. |
| Departure of the master to your home or office (within the Moscow Ring Road) | 0 |
| Installation of Wi-Fi Internet or TV in the apartment | For free |
| Wi-Fi Internet 100 Mbps | from 300 RUB/month |
| Wi-Fi Internet 200 Mbps | 500 RUB/month |
| Wi-Fi Internet 500 Mbps | 850 RUB/month |
| Wi-Fi Internet 100 Mbps + TV 124 channels | 550 RUB/month |
| Wi-Fi Internet 200 Mbps + TV 124 channels | 600 Rub/month |
| Wi-Fi Internet 500 Mbps + TV 124 channels | 1050 Rub/month |
| Digital TV 124 channels | 320 RUB/month |
| Digital TV 170 channels | 580 RUB/month |
| Rent a Wi-Fi router | 10 Rub/month |
| Rent a TV set-top box | 10 Rub/month |
| Router installation and configuration (without internet connection) | 400 - 1.100 |
| Update network driver (if needed) | 300 |
| Types of work (cost) |
| Departure of the master to your home or office (within the Moscow Ring Road) - 0 rub. |
| Installation of Wi-Fi Internet or TV in the apartment - Free |
| Wi-Fi Internet 100 Mbps - from 300 Rub/month |
| Wi-Fi Internet 200 Mbps - 500 Rub/month |
| Wi-Fi Internet 500 Mbps - 850 Rub/month |
| Wi-Fi Internet 100 Mbps + TV 124 channels - 550 Rub/month |
| Wi-Fi Internet 200 Mbps + TV 124 channels - 600 Rub/month |
| Wi-Fi Internet 500 Mbps + TV 124 channels - 1050 Rub/month |
| Digital TV 124 channels - 320 Rub/month |
| Digital TV 170 channels - 580 Rub/month |
| Wi-Fi router rental - 10 Rub/month |
| TV set-top box rental - 10 Rub/month |
| Router installation and configuration (without Internet connection) - 400 - 1100 rubles. |
| Network driver update (if necessary) - 300 rubles. |
call the master
Call our company and we will help you with the selection of the necessary equipment and install Wi-Fi routers of any models and manufacturers. As a result, you will be able to connect to the Internet each of your devices. And you do not have to lay a lot of wires, entangling them all around.
Internet access anywhere in the apartment!
It is enough just to install wifi at home, and this will allow you to work at a computer or laptop not only in one place, but also wherever it is convenient. In addition, installing a Wi-Fi router will allow you to combine all devices into a single network. For example, it will give you the ability to print documents from any computer on one printer. And you can share files between devices without the tedious use of flash drives.
Our guarantees
Is the technician 30 minutes late?
You get a 20% discount
The specialist was 1 hour late?
50% discount is yours!
Did something happen again?
You have a guarantee up to 2 years
We failed
solve the problem of?
So we'll refund your money!
Do not know how much it costs to install a router and which model to choose?
Unsure which manufacturer to trust? Call us and we will help you choose the best option from such proven brands as D Link, Asus, Zyxel, Trendnet, TP Link, etc. Leave a request to call the router installation wizard, and our specialist will bring it to your home or office in Moscow new modern wireless router and install it.
order any services and get
antivirus for a year as a gift!
order any services and get
antivirus for a year
For a present!
call the master
Why are they turning to us?
- We are recommended to best friends
- Helping people since 2005
- Adequate cost of services
- Free consultation in the future
- We solve your problem, not divorce
- All specialists of the company have passed mandatory certification
Feedback from our clients
- No extra wires.
- High data transfer rate (up to 900 Mb/s).
- Quickly add new devices to the network.
- Ability to connect to the Internet all devices with Wi-Fi module.
- The ability to use the Internet anywhere in your apartment or office.
overall rating:
Heartfelt thanks! Yesterday, on April 8, a young man named Vitaliy arrived at the request. Agreement No. 493. In my laptop in the "mail" suddenly, for no reason, the font changed and the letters became literally microscopic. Despite the fact that (as he said) he had not encountered such a problem before, he quickly found a solution. And now I am writing to you... Thank you for the qualified help. Regards, Tatiana
overall rating:
Good service!
Elena Nikolaevna
overall rating:
There's been trouble! My old cpu stopped loading. I was already preparing money to buy a new one, because. no one asked from the neighbor's guys, so no one could help. And then a neighbor advised me to seek help from your computer repair company. Of course, I did not particularly hope, but you exceeded all my expectations! The block was not just repaired, but it began to work even better! That's what professionals mean!
Installing a wifi router - one for all and all for one!
The modern age of information technology dictates its own conditions: the number of computers per capita is constantly growing. More and more people prefer computer technology: it is convenient, and sometimes necessary. Many families in Moscow have several computers at once. It can be a stationary personal computer, a laptop or netbook, a tablet, a communicator or a mobile phone with great functionality.

So, there are several computers in the family and everyone needs Internet access. But, as a rule, only one Internet access channel from the provider is provided to one apartment or private house.
In order for several computers to connect to it at once, you need to install a wifi router. This is many times more convenient than using one channel, connecting the modem or network cable to different computers in turn. In addition, not all providers allow the use of their channel with different computers.
Installing a router at home, what's the use?
The masters of our home computer help service will install a router for any Internet provider in Moscow and the Moscow region: Beeline (Beeline), Akado, Rostelecom (Onlime), NetByNet and other Internet providers.
Installing a wifi router is the solution to many problems!

Properly installing a Wi-Fi router is not an easy task. Many factors must be taken into account. These are the features of the network protocols of your Internet provider, and the type of communication channel and its frequency, and the types of devices connected to the network. It is very important to correctly select and configure network encryption, protection against unauthorized access, and much more.
Site engineers will be able to help you with any issues related to installing wifi at home or in an apartment. Believe that the price of the service will not shock you. The most popular services are the installation of d link dir 300, d link dir 615 routers, asus rt g32, asus rt n10 and n12 routers, zyxel keenetic giga.
Install wifi at home, apartment or office - our job!